Discover the hidden side of the Blue Mountains with this complete guide to hiking Mount Hay and Butterbox Point. Tucked away at the end of the notoriously rugged Mount Hay Road near Leura, this combined day hike swaps the crowded tourist lookouts for dramatic, uninterrupted vistas over the wilderness of the Grose Valley. From scaling the rare, volcanic basalt cap of Mount Hay to tracking across the windswept sandstone ridges of Butterbox Point—and hunting down the area’s famous, bizarrely weathered ironstone formations—this trail delivers some of the most spectacular scenery in New South Wales.
Butterbox Point & Mount Hay
📍 BLUE MOUNTAINS NATIONAL PARK
Distance7.4 km
Duration02:56 hrs
Elev Gain+338 m
Elev Lost-337 m
Date
14 September 2024
Starting Point
Mount Hay Road
Difficulty
Moderate
Pace / Gear
3.7 km/h — Light day pack
Highlights
The Butterbox, Butterbox Point, Mount Hay, Butterbox formations
🗺️ Interactive Route MapPinch or use wheel to zoom
Towards the end of Mount Hay Road lies Butterbox Point, an awe-inspiring location that sits well off the beaten track. That isolation is thanks to Mount Hay Road itself—a long, winding, unsealed track that spears deep into the wilder, more remote reaches of the Blue Mountains. The 12 km drive out to the point takes around half an hour. While the route is generally passable for standard 2WD vehicles, poor weather can quickly tear up the dirt surface, opening up deep potholes that require a high-clearance vehicle. If you time it right by keeping an eye on online trail updates, you can plan your trip just after the council's periodic grading for a much smoother journey.
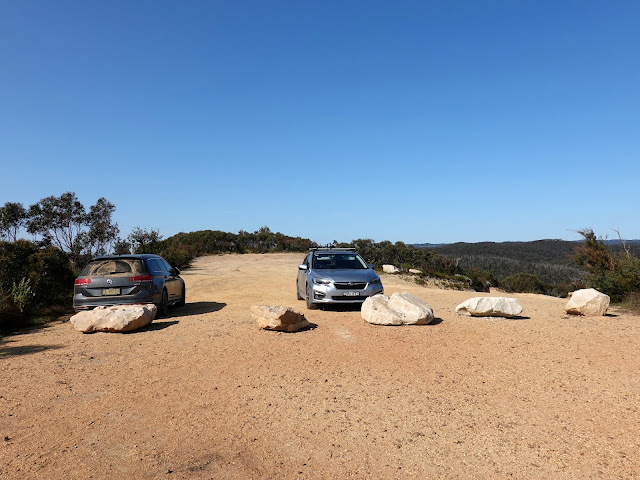
There is a small parking area at the trailhead that services both the Mount Hay and Butterbox Point tracks. Because they share a starting point, both walks can easily be combined into a single outing—as I did today—leaving you with just one decision to make: which one to tackle first.
The parking area at the beginning of the track
Right at the start of the track, you will find a prominent information sign. This board was recently replaced after the original was destroyed in the devastating 2019–2020 Black Summer bushfires. Having last visited the area not long after the flames were extinguished and the national park first reopened, it is incredibly heartening to see how beautifully the resilient native vegetation has recovered.
From this trailhead, the hike follows a distinct Y-shaped route. A small marker post clearly guides the way at the junction: branching east takes you toward the summit of Mount Hay, while veering west leads out onto the exposed ridge toward Butterbox Point.
The information board at the beginning of the tracks tells you more about the area.
I opted to head toward Butterbox Point first to make the most of the quiet morning and the favourable light. From the marker post, the path remains fairly flat as it passes just above Butterbox Swamp. This unique hanging swamp habitat forms over thousands of years where water becomes trapped in the organic soil, held aloft by an underlying, impermeable layer of claystone.
This fragile ecosystem also serves as the headwaters for Butterbox Creek. The creek quickly gathers momentum as it leaves the swamp, carving an incredibly steep, technical route down through the sandstone—a slot canyon strictly for advanced adventurers with the right gear and ropes.
Butterbox Track
The Pinnacles
The crags above Butterbox Swamp
Butterbox Swamp
Approaching the Butterbox
The trail soon ascends a gentle rise and leads directly toward a large, prominent rock outcrop known as the Butterbox, which gives its name to Butterbox Point. This distinct, rectangular formation was named around 1918 by Cyril Byles, a chief signals engineer for the NSW Railways, who explored the Mount Hay area alongside his daughter, Marie Byles, who would later become a legendary pioneer of Australian bushwalking. He noted that the flat-topped, vertical sandstone block bore a striking resemblance to the wooden butter boxes commonly used in commerce at the time.
When you reach the base of this massive monolith, the track splits, allowing you to pass around either side. I prefer to take the left fork first; it wraps around the protected northern flank of the rock, allowing you to save the jaw-dropping, uninterrupted views of the Grose Valley for a little later in the loop.
The Butterbox (or Hay Monolith)
The path hugs the northern base of the monolith, passing a couple of large sandstone overhangs—or caves, as they are often referred to by walkers seeking a bit of shade. As you reach the far eastern end of the Butterbox outcrop, the track becomes a little rougher and more unformed underfoot.
Looking straight ahead, you are treated to a dramatic view of the towering, vertical cliff walls directly above Butterbox Canyon. But it is off to the right where the landscape truly opens up: the sweeping, massive expanse of the Grose Valley completely steals the limelight.
The first of two caves
The Butterbox Track approaches the edge of the cliffs
Views of the Grose Valley from the cliff edge
First, you step out onto a broad, flat rock that offers a completely uninterrupted view straight down the valley. It creates a fantastic illusion, appearing to hang directly over a sheer, vertical drop, though a closer look reveals a reassuring ledge beneath.
The panorama from this vantage point is a masterclass in Blue Mountains geography. To your left, the immense, towering precipice of Walford Wall stretches out, leading the eye toward Du Faur Head. Directly opposite, the massive cliffline of Banks Wall dominates the view, topped by Edgeworth David Head and the distinct, basalt-capped dome of Mount Banks. Then, off to the right, you can trace the deeper path of the Grose River as it flows eastward, carving its way through the sandstone maze toward its eventual confluence with the Hawkesbury River several kilometres downstream.
Grose Valley
Butterbox Point
Grose River and Edgeworth David Head
From here, you can continue by climbing down a short, rocky outcrop and heading toward the prominent point directly ahead of you. While the sprawling view of the Grose Valley remains much the same from this further vantage, the shift in perspective gives you a significantly better look right down into the depths of Butterbox Canyon and a clearer, more intimate angle on the sheer scale of the Walford Wall. This exposed rocky platform is as far as I ventured today before turning around to head back.
Butterbox Point
Grose Valley panorama
Continuing along the Grose Valley
Walford Walls
Butterbox Canyon
Grose Valley
Grose Valley
Following the trail back toward the Butterbox, you will find a few paths branching off to the left. These pass around the cliff-line side of the monolith, perched high above the valley. If the weather is poor or the wind is howling, it is best to avoid this side as it becomes highly exposed for a short distance. Once you are past this section, you can also opt to clamber up onto the flat top of the Butterbox itself for a spectacular, elevated perspective across the entire plateau.
Below the Butterbox
More views from the edge of the cliff
Grose River and Edgeworth David Head
The path beneath the Butterbox
The many paths around Butterbox Point
Butterbox Point and the Walford Wall
Mount Hay
The path heads along a broad ridge offering expansive views to the east, stretching over the swampy birthplace of Mount Hay Creek and reaching as far as the gleaming skyline towers of Parramatta and Sydney on a clear day. Pushing onward toward Mount Hay brings you to the foot of a rocky spur, marking the start of some more interesting, occasionally hands-on hiking.
The path picks its way around the head of this small valley
The path towards Mount Hay can be clearly followed
Mount Hay
While the path can be a bit indistinct at times, route-finding is relatively straightforward—simply head up through the rocks and avoid any drops or ledges that look too steep. As you gain elevation, the spur rewards your efforts with tremendous, sweeping views across the Grose Valley.
Climbing Mount Hay
The change in vegetation is obvious as you near the summit
Passing an informal lookout leads to the final section of the climb, where you enter the thick canopy of trees that dominates the summit. Unlike the surrounding sandstone plateaus, Mount Hay is capped by basalt. This volcanic rock creates a highly fertile soil that supports a completely different mix of plant species, resulting in the lush, dense covering at the peak. Weaving through the trees brings you to a rock cairn marking the highest point. Sadly, there are no sweeping views to be had from the summit itself due to this thick blanket of vegetation.
The summit of Mount Hay
As the age-old saying goes, what goes up must come down, so I retraced my steps from Mount Hay's summit back down the rocky spur to the marker post near the car park.
Views from the descent off Mount Hay
Mount Hay
The Grose Valley
The western slopes of Mount Hay
A distant Sydney
The path back towards the car park
The Butterbox
Mount Hay Track
Having made it safely back to the car park, there was still one final objective on my mind. I had read about the strange rock formations that can be found in the area and was expecting to stumble across them while I was out at Butterbox Point, but I hadn't seen any sign of them. After a quick internet search on my phone, I pin-pointed their location and set off to find them. - they are actually located right on the exposed rocky plateau just north/northwest of the main Butterbox monolith itself.
There's a faint path that heads off to the left, away from the edge of the cliffs and back toward Butterbox Swamp. Almost immediately, you come face-to-face with the first of many bizarrely shaped boulders.
These structures were formed through two distinct geological processes. First is the formation of concentric ironstone patterns called Liesegang rings. These are believed to have developed over millennia from the chemical precipitation of insoluble haematite from soluble, iron-rich groundwater moving through porous sandstone. Second, as the softer surrounding sandstone weathered away over time, the incredibly hard and resistant haematite ironstone rings were left exposed, creating the distinct, ribbed formations seen today.
Butterbox formation
Butterbox formation
Butterbox formation
Butterbox formation
Butterbox formation
After wandering around for a bit, I decided it was finally time to return to the car park—properly this time—and start making tracks back to Sydney. As ever, it was a sensational day in the mountains thanks to the superb weather and the equally superb views. If you can face the challenge of Mount Hay Road, this double-header should be high on your list of places to visit.



No comments :
Post a Comment